Trost House

Trost House

Saturday, August 17, 2013

Nearing the Stopping Point for Now

House 3 upstairs furniture
pilot house, House 1 and House 2 waiting for House 3
All three houses have their components constructed. They're not fully assembled because I don't have the kitchen furniture (counters) yet, and they won't transport well with the porches or roofs on.


There are some more details to add, including in the second floor and kitchen furniture. The final assembly and landscaping will take a bit of time as well; that requires the bases and domes and no more major transportation of multiple houses at a time. It's a big, big milestone.


Of course, I discovered late in the day that the small gable isn't on House 3's roof yet (no clue why or how that escaped notice) and I'm sure that, along the way, other details that have been skipped or overlooked will emerge--or inspirations about ways to improve/embellish what's already here. For example, it occurs to me as I write this that the front doors don't all have doorknobs, though they do all have mailboxes!

Friday, August 16, 2013

House 3 has Walls! Transport Plans

House 3 has all its walls in place! To go yet: second floor furniture, attaching porches and sunroom, landscaping. House 2 still needs its brick applied; I was going to do it today and just couldn't quite bring myself to that job. Still, it's been a good day.


Michael worked a bit on how we're going to transport all four houses (pilot house, three finished houses) and came up with a pretty elegant solution. We'll put some packing peanuts in to cushion things a bit, but the fit is so good, not many will be required.

Thursday, August 15, 2013

First Wall on House 3

Today held many interruptions, but showed forward progress nonetheless.  All the brick and trim has been applied to House 3 and all the brick cut (but not applied) to House 2. And, finally, finally, finally, the first wall is on House 3. If you count the fact that the sunroom is already attached to the back wall, then two walls are complete. Of course, the two that remain are the most complex and have more components than the two that are complete, but it's important to start with the front wall and build from there, because it has clear positional markers (the window box on the front) and all else is positioned from there.

I didn't take pictures of putting the brick or trim on the components, but did take pictures of the first wall rising. Unfortunately, the camera battery seems to have been dying along the way, so they're so dark they are hard to see.


Here's a shot of the wall after battery-change. No window box yet--that's when the interruptions started.

Wednesday, August 14, 2013

Back in the Forward-Backstep Cycle

Organizing furniture for House 3
As I was contemplating making great progress on House 3's final assembly today, I realized that I'd forgotten the brick on House 2. Sigh. Doing brick is a pain and among my least favorite parts of this, so that didn't get done today; maybe later in the week.

weighting down second floor, House 3
Upon examination, House 3 doesn't have all its trim, and the roof gables weren't installed. It took about an hour to FIND the gables that I'd carefully put in a very, very safe place. Why they weren't with the rest of the house in its box is a mystery. (Dumbheadedness on my part is the answer, probably.) By the end of the day, the gables were dressed and glued in, and the rest of the house trim was coming right along.

Gluing in a gable (band on end to secure roof in place)
Otherwise, furnishing the first floor and gluing on the second floor were the  major accomplishments of the day. Tomorrow, more brick (yuck) and second floor furnishings, and then, finally, walls for House 3.


House 3 Sitting Room

Furnished dining room, House 3

Front room, House 3

Tuesday, August 13, 2013

House 2 Nearing Finish Line


All of House 2's walls are up, save the back wall that holds the sunroom (already attached). All the trim has been attached. As soon as the internal furnishings are complete, House 2 is ready for final assembly: porches and roof.

Now, it will be set aside while House 3 reaches the same point.

Monday, August 12, 2013

House 2 Walls Rising!

Finally, the walls are going on for House 2. Finished up the downstairs by putting a sideboard in the dining room (I seem unable to help myself in making things that will never been seen).


 Then moved onto adding walls! As usual, started with the front door section, since it has a designated place to be, and a way to measure fit.


Then, the rest of the front and the start on the two sides. 


The east side is the most complicated, and that's as far as I got today. Not totally happy with the fit I achieved on this side, but it's ok, I think.  I didn't get to the bay on the West side yet. From this angle, you can see yet another item that will never show--the painting on the upper wall of the stairwell. I'm not sure there's any window that will show it, even if the curtains weren't obscuring things. 


The furniture in House 2 is arranged a bit differently upstairs, as its owner remembers a different era of how the rooms were used.

Sunday, August 11, 2013

Creeping Along

Still no walls. Lots of new furniture and more structural advances, and wiring, though. I made two beds today with different numbers of posts.

The reason there are two holes for wiring now in the floors of Houses 2 and 3 is because we had to drill a new one to move the wires so they won't show. Putting the downstairs walls in now revealed the problem that I kluged over in House 1. I papered over the original hole in House 1 and will likely do the same in Houses 2 and 3.


 The second floor of House 2 attached, finally, with all the first floor furniture in place that's going to be there.


Saturday, August 10, 2013

House 2 Furniture

I'd forgotten that, before the walls can go on, the supports, stairwell and furniture must go in. House 2 already has its in place; House 3 got its today.


The stairwells for Houses 2 and 3 are of Michael's design, and it's characteristically more elegant than the contraption I cobbled together for House 1. 


I got all the furniture into House 2. Nothing for House 3. Tomorrow, finally, the walls for House 2. Whew. 


Friday, August 9, 2013

Amusing Myself

I just couldn't bring myself to close up House 1, without more furniture on the second floor, even though I'm pretty sure the curtains are going to obscure almost everything. So, I indulged myself today. I'll know it's there, at least.


Thursday, August 8, 2013

Slow News Day

We had other stuff to get done today that reduced the time I could spend on the project, and then, what work I did was more back-tracking and hardly any forward progress. The pictures of the backtracking--putting the fantastic leaded glass windows in all three houses--didn't turn out, so nothing to see there. It's hard to see them when they're not backlighted. Houses 2 and 3 were easy, of course, since they're not fully assembled. All that was involved there was to peel the already-attached windows off, move the curtains and glue them back on in the right place.

House 1, which has three of four sides firmly attached to both the first and second floor was a bit more of a challenge. I ended up prying the really fragile window frames out of the existing windows, pulling off the curtains, gluing the new windows to the frames, cutting them just to fit, then gluing the frames, windows and curtains back into the window void. I'm still not sure how it's going to look and will reserve judgment until the glue is dry and totally cleaned up tomorrow. Time will tell.

Otherwise, I sorted furniture that has to go in as Houses 2 and 3 are assembled, and put a tiny bit more in the second floor of House 1, preparatory to getting the lights placed and gluing on the roof plane. I'm still debating the order of roof plane and fourth wall, since the fourth wall must fit between notches in the roof plane. In theory, the fourth wall should go on first, but there's stuff (mostly plants) that goes in it that I don't have yet, so it's a bit of a conundrum. Onto assembling at least a wall or two of Houses 2 and 3 tomorrow, I hope.


Wednesday, August 7, 2013

All Three Sunrooms Done; Fantastic Leaded Glass Windows

Another huge step forward today--and on two fronts. First, Kathryn and Alan from Templewood Miniatures printed leaded glass windows, from a design drawn by daughter's fantastic friend. The packed arrived today and they are fantastic beyond words. I'm really excited about these. They are a big touch that I hadn't expected to be able to add. Now, all I have to do is figure out how to get it onto the already-closed-up House 1. I have some ideas, and am otherwise still mulling that one.


The sunrooms went together well today, even if getting the "glass" attached to the really fragile ribs is a fraught process.

This method, with doing them panel by panel, worked pretty well.


I used a bit of a Grandt Line 1/12 scale fence for the hood ornament, and am pleased with how it turned out. It's a little larger scale than the real thing, that has 11 spikes, but it looks good and given the options, seems pretty darn good to me. I'd bought three different styles of fencing and was pretty pleased with how this one turned out.


All in all, another satisfying day of progress!

Tuesday, August 6, 2013

Sunrooms


Today brought work on the sunrooms. Only the sunroom for House 1 got all the way assembled; there's something I've forgotten about getting the windows installed in a way that sticks to the ribs, as the resulting product is ok, but not great. It's again a multi-step process: first assemble the base, then put on the brick and trim, then assemble the floors (which had to be heightened to bring level with the kitchen floor), then assemble the ribs (very fragile) then install the windows (old computer chip bag to get the right color). 

I try to keep the trim all one piece so there aren't big gaps as it goes around; I ended up using a bit of fill in one or two places (narrow strips of lumber) but am overall pretty happy with the result.


I had a few false starts with the ribs and window stuff (trying to get the geometry right for cutting the plastic so it would desired direction.


There's something I'm not remembering about attaching the ribs and glass to each other... will experiment more tomorrow.


Monday, August 5, 2013

Milestone! All Porches Done!

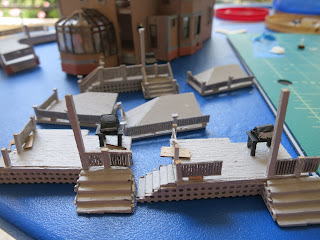
All porches--front and back--done for all three houses!! Next up, sunrooms and assembly of Houses 2 and 3. Then, landscaping and they're all done!

The process for for the porches after the measuring, converting measurements, drawing pieces, working with and answering questions for the unbelievably patient and skilled Susan Karatjas (SDK Miniatures) who did all the custom laser cutting, build a test model, adjust the measurements, redraw the pieces, get the final cut and prime/paint all the pieces. THEN the complicated part starts. I hand-fabricated all the porch columns, handrails, column and post caps and the brick piers (front porch only) and lattice for under the porches, though I suppose they could have been specified and cut along the rest of the house. Probably, if this was to be a kit, all that stuff would have to be cut and supplied, though it could be more trouble and just as complicated to keep sorted and straight as just hand-fabricating. Hard to tell. It's a toss-up.

I put the porch ceilings together first for no special reason, except that assembling roofs is both fun and  pleasing. The porch roofs on the Trost House were originally metal, not shingled, so their assembly is slightly different than the house roof, which was shingled row-by-row. For the porch roofs, the process is:
1. tape roof planes together (three each for the front porch, two for the smaller ice porch)
2, glue seam/s
3. paint the outside to seal seam a bit more and get a consistent finish
4. glue custom wedges to porch ceiling, then glue roof to porch ceiling (pictured yesterday, I think)
5. starting at one edge, measure and cut railing; measure and cut railing pillars; piece roof railings sll the way around outside edge, taking care to align the pillars and ceiling posts where they align
6. glue fascia around roof edge
7. put pillar caps on roof pillars (I cut a large supply of those earlier since I would be needing so many)
8. touch up paint, declare victory on roofs (mostly done yesterday)

Assembly of the porch itself involves:
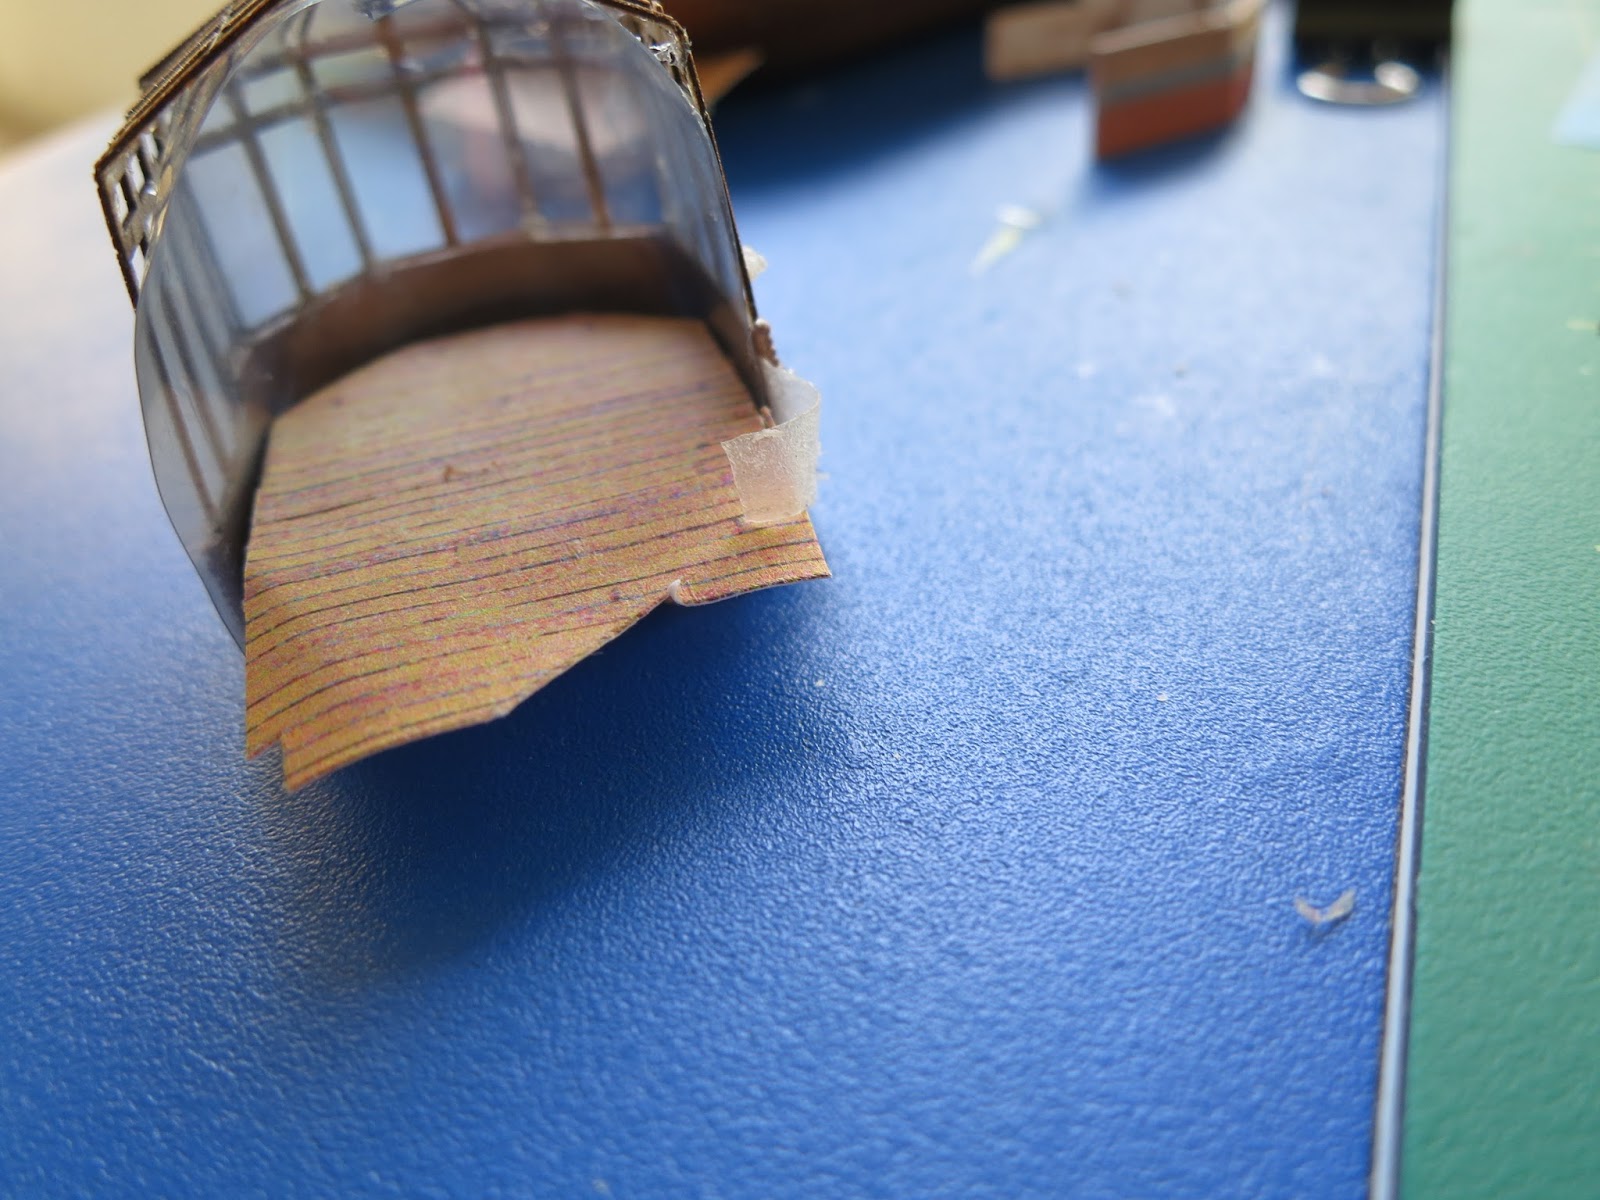
1. gluing foam core under the porch floor to raise it to the level of the house floor
2. put fascia/edge board on visible edges (not the two that connect to the house to assure tight fit up against the house when later attached)
3. glue steps to base
4. put lattice around edges under fascia/edging and on sides of steps
5. place main porch support in place, test with roof and house for fit, glue in place
6. starting at edge, measure and cut railing; measure and cut railing pillars; piece railings around edge
7. apply railing caps/handrails (better done before installed, if you remember)
8. build step handrails and caps, glue into place
Porches done! It sounds simpler laid out like that than it felt, especially doing three. The railings and posts are fiddly.

The porches cannot be installed on the house until later--in the case of the ice porch, the sunroom must be assembled and connected to the back wall of the house and the house closed up because the ice porch laps around the back corner and butts up against the sunroom. The sunroom has to be attached to the back wall, and then the back wall fits into notches in the attic ceiling plane (to which the roof attaches) before the roof and back wall can be glued on. THEN, finally, time to attache the completed porches. I've been dry fitting them all along, and the fit is great. The front porch goes on last because there's so much handling involved in attaching the sunroom and back wall and roof; it's easier not to have that extra appendage during all that--and the porch then doesn't get damaged with all the handling. The railings are the most fragile part, so setting the porches aside safely until the end is important.

Finishing these is a big milestone along the way. The sunroom is complex to make work, and fragile, but making the railings is so fiddly that having that all (ALL) in the rear-view mirror feels really, really good.  The sunroom is a different kind of challenge, and the change of pace will be nice. Not sure yet whether that or the assembly of Houses 2 and 3 will come first. Will see what I feel like tomorrow.