Trost House

Trost House

Sunday, June 30, 2013

Yes!

 Finally, I started the parts that make it look like our house. I got all the windows into three sides of the house, got some of the little bits that somehow escaped the painting fixed up and glued on, and trimmed out a few of the windows. The south side windows are fully trimmed, and they need only windows and curtains. The side still needs bandboard and corner trim and, of course, the sunroom.

The front of the house house has all the windows in and framed. The bandboard is complicated on the front and I haven't figured out how I'm going to get it to match at the edges better than the pilot house, so I'm going to leave that for a bit. Oh, and I got all the gables done, too.
Gable trimmed out.
South Side and Front.

The east (driveway) side has all the windows in (save the basement and I'm still thinking about whether my plan for those is sensible enough to proceed) and has the same bandboard needs--and dilemmas. 

East (driveway) side
All in all, it was very satisfying. It went a bit faster than I remembered, in part because most of the many (many) windows on the east side aren't individually trimmed with the uniform blue touch: they have bandboard at their tops and a continuous blue trim on top of that. So, once I figure out how to deal with the continuity problems of the bays, that will go faster than cutting the blue trim for each window. The blue doesn't show very well in this picture, but it does top the bandboard at both levels.


I need to think about how to stage the other two houses: I think I'll start the priming and painting and intersperse it along with continuing the roofing, so the houses can each progress a bit. I need to get through some of the construction with the new cut, to make sure it's going to work and don't want to do anything that will have to be redone on the following houses.

All in all, a very satisfying day!

Saturday, June 29, 2013

Nothing today

I haven't been feeling top-notch today, so rather than doing stuff while in a fuzzy state and maybe having to redo it, took a day off. Back at it tomorrow!

Friday, June 28, 2013

Paint Color Vexation

As predicted, yesterday didn't include any particularly noteworthy progress because of other demands on my time.

I did sneak in a break to apply a coat of paint yesterday, thinking that would mean I could start dressing the components today. To to my intense frustration, I then discovered that the color I had applied was all wrong. Since I've mixed the base color many times (both 1/12 dollhouses for our girls are the same color as the Trost House, as well as many miscellaneous things I've constructed in smaller scales),  I couldn't understand why it was way (way) too red. The color is an easy mix from from burnt siena and white and has never gone wrong before. It was, of course,  Michael who asked the question that led to the right answer: the paint I have is a different brand than what I've used before. I was too complacent about it, so I didn't really stop to color-check, just putting a coat on the components for the siding for an entire house before I realized how off it was. Naively, it never occurred to me that the color wasn't a standard mix....

Fortunately, they sell paint here, so we managed to get some of the same brand as used before from an art supply store, and it mixed perfectly to get the desired shade. Then, I had to get back to the work rudely calling on my time, though I managed to sneak in shingling another roof plane for House 2 as a mental health break at one point.

Today, I got to painting again. House 1 is now all painted in a color that is within the range, though because the correct color went on over the way-too-red shade, it will be a bit off from Houses 2 and 3. I can live with that.

While paint was drying, I got a third roof plane for House 2 shingled, so that process is inching along as well. I'm getting pretty efficient at the shingling, having discovered that taping a piece to the cutting board with the finest grid lines is a lot easier than drawing guide lines on each plane. And, no more oopsies, at least so far, in applying shingles to the correct side. I'm in the roofing groove, including having a sense of how long I can work on it before burning out. I think I have enough shingles on hand  to finish House 2, and will hope that the supplies for the final house arrive before it's time to buckle down on that job. I still haven't decided exactly how to assemble the roof to give the best long-term result, and am not too worried about it. There's still time to figure that out.

Since finally tomorrow I should be able to start the fun process of inserting windows and applying the window frames, bandboard and trim to House 1, not having shingles for House 3 for a while yet shouldn't be a problem.  I like the process of dressing each component with windows and trims, because that's when it really starts to look like something. I'm looking forward to it. Time for dinner!

Wednesday, June 26, 2013

Progress!

Things are starting to look like something! After doing a dry fit for House 1, we decided that the bays do not need to be beveled after all. Hooray!  
We made alterations between the original plan and the final cut to reduce the width of each of the bays, hoping for a better fit than the pilot house has. It worked, we think. (Yes!) As anticipated, the new approach means that  some filling between the wall segments will likely be required. I brought some raw lumber for precisely that purpose. Filling is a ton better than beveling, especially for the odd angles of the bays.                                                (It took two sets of hands to dry fit and photograph at the same time, so these are Michael's hands, not mine, by the way.)
Since the dreaded beveling isn't going to be necessary at least for the moment (the base of the sunroom will still need beveling, but goodness, there's so much less of that, I am happy to do that by hand and count my blessings while I do it), I got on with painting. 

Even though I did all the priming and staining for all three houses at the same time, I decided to move ahead one house at a time for a bit while I make sure the final cut and related plans really work out as hoped. 

Once I made that decision, I went ahead and sorted out all the inserts and frames for all the windows and doors by house (THAT was satisfying). As a process, that wasn't very photogenic, so I didn't document it, nor did I take a picture of completing the shingling on one more roof plane on House 2, while I participated (well, listened to) a really boring conference call to which I was committed.

Tomorrow will likely see less progress, as there's more work to do that will interfere with my fun, but today saw so much progress, I'll manage. It always takes me a while to get the paint color mixed just right, so I'll likely need another coat of color to the components for House 1 to get it just right before I start dressing the sides with bandboard and trim. Just seeing  the color emerging and is a great thing. The spray paint primer coat seems really to help with the warping, by the way. After the pieces dried, even though they warped a bit when the color went on, they're almost all totally flat.  More soon.

Tuesday, June 25, 2013

Too Much Work; Not Much Progress

Stained window inserts drying. 
Instead of getting to the beveling (my main goal, so I can do it all, and get on with painting and dressing the exterior of the house with bandboard, window trim, windows, etc.), I was interrupted periodically with work that needed to be done. I'm clearly not doing a great job of work-life boundaries. Instead of making serious headway as hoped, I worked on little stuff that happens in batches and can easily be set aside:  finishing the roofing on House 1 and more prep work. That included staining window inserts, experimenting with beveling techniques (not as much of that as I'd hoped), cutting foam core for the base planes to rest on, and organizing, which is always pleasing. I even made labels, though there's no picture of that step.
I sorted out the bits for the houses, though I still have the items that Susan cut and bagged all together (the column on the right hand-side) to separate and allocate among the three houses. It was pleasing to make real progress on the separation, now that the priming is done. As soon as all the window inserts are stained (should finish tomorrow!), the window inserts and frames can be allocated each to the sides of the house they belong on. That will be a big step, because then, after the sides are painted with the base coat color (Renwick Rose Beige), they'll be fully ready for the dressing stage, one I find gratifying and fun.

45-degree bevels are easy. The others are more challenging. 
Foam core (right)  for base planes (left).


I got much, though not all, of the pesky work done today, though there will still be some needing attention tomorrow.  The day wasn't a total loss: I did keep up my string of getting exercise every day so far (at least 30 minutes' worth), so that counts for something. My hope for tomorrow is that I'll finally make progress on the beveling, the most serious hurdle in this phase of the project. Famous last words?

Monday, June 24, 2013

One Step Backward, Two Steps Forward

Today saw (I hope) the last of the priming, and the first roof almost done.

I revised the materials list and ordered enough shingles to complete all three houses. I still need to make a final decision about how to assemble the roof. The pieces for the first model are resting here on the pilot house roof; it's put together with Blenderm surgical tape, as recommended by our daughter's wonderful architecture student friend. The fit is good, but not great, so I am considering using the tape as the gluing jig, as it were, and then gluing as well. Of course, it may just be that I'm not great with the tape (which is very, very sticky) and I'll improve. I'm going to experiment some more with the pilot house before I commit for the final assembly After it's glued or taped in final form, I'll put the ridge caps on to see how the roof will look.

Progress report: The first roof is all-but-done, and another 20 minutes will probably finish the shingling on the one remaining roof plane. (There's one plane that is also done that wouldn't sit nicely, but it's complete as well.) I decided not to try to fit the shingles around the small gable on the front of the house, but to glue it on top of the shingles—it just seemed like too much fussing around to try to shingle around the footprint of that gable. Hope that was a good choice. We'll find out.

I repaired one of the places where reversing the roof plane created a hole and have one more gap to figure out how to repair as seamlessly as possible. My story, and I'm sticking to it, is that 60-year old roofs on 100+ year old houses have problems, so of course there are messy bits.  Truth be told, I'm also hoping that once I weather the roof a bit, the repaired areas won't show, or at least not quite so much.

Since the shingling process is about how I remembered it (relatively tedious), I'll keep interspersing shingling whenever something mindless is required or I hit a problem. I hadn't intended to finish this entire roof in one go like this, but when I realized there was a supply-on-hand deficit, it needed be finished to make sure I ordered enough to complete all three houses. The diamond shape shingle takes about 1.5 times more shingles to cover than the rectangular shingles, assuming that my original calculations were correct (not a sure thing). Either way, sufficient shingles to finish are on the way, and after the roof-repair is complete, I will be able to get back to the beveling.

All in all, a good day's progress at a reasonable pace, interspersed with some work that needed to be done (vacation status notwithstanding, sigh), some reading, some exercise and some lovely gazing into space.

Sunday, June 23, 2013

A Day of Progress, Setbacks and A Big Oops

It was a lovely Sunday here. A little grey now and then with brilliant sunshine in the afternoon. We had a quiet day and I spent it on the terrace reading, catching up on work email a bit and working on the project at a leisurely pace. Things are forward of where they were this morning.

One disappointing setback: we have wire fencing that extends the height of our backyard fence because we have an unbelievably social and athletic dog who was jumping the fence regularly. Michael put up the wire fencing that extended the height of the fence, and problem solved. (Well, almost solved. She still blew out one of her knees with her jumping, but she seems good as new now.) I was excited when I found some plastic fencing I thought could be adapted to replicate the fence extension. I primed it amongst all the other spray priming and today got it out to play with it, figuring it would be fast and satisfying amidst some of the other necessary-and-not-such-fun items. Sadly, it's entirely the wrong scale. Oh well, onto Plan B. I haven't hatched that yet, but something will come to me, I'm sure. I read somewhere about using toile for veils as chain-link fencing, so maybe there's something to be done from that, or maybe there's a way to modify this. The stuff we have has loops on the top, which is what particularly attracted me to it. I should have realized that it was too big earlier. There will be a use for it yet, I'm sure. I just haven't thought of it yet.


On the progress front, I realized after shingling one of the roof planes yesterday that I very well might not have enough shingles for three houses. Either the diamond shingles take more to cover, or I miscalculated after the trial run.


I figured I'd better get one roof done and do some calculating before too much more time passed so I could order additional shingles and still get them in time to complete all three houses. So, instead of the beveling, I set about shingling, and made great progress. It's not very interesting work, but it moves along fairly quickly and is satisfying.

By the end of the day, I had pretty much the major roof planes done, though there are still a number (we call that five, actually) of smaller pieces still to go.

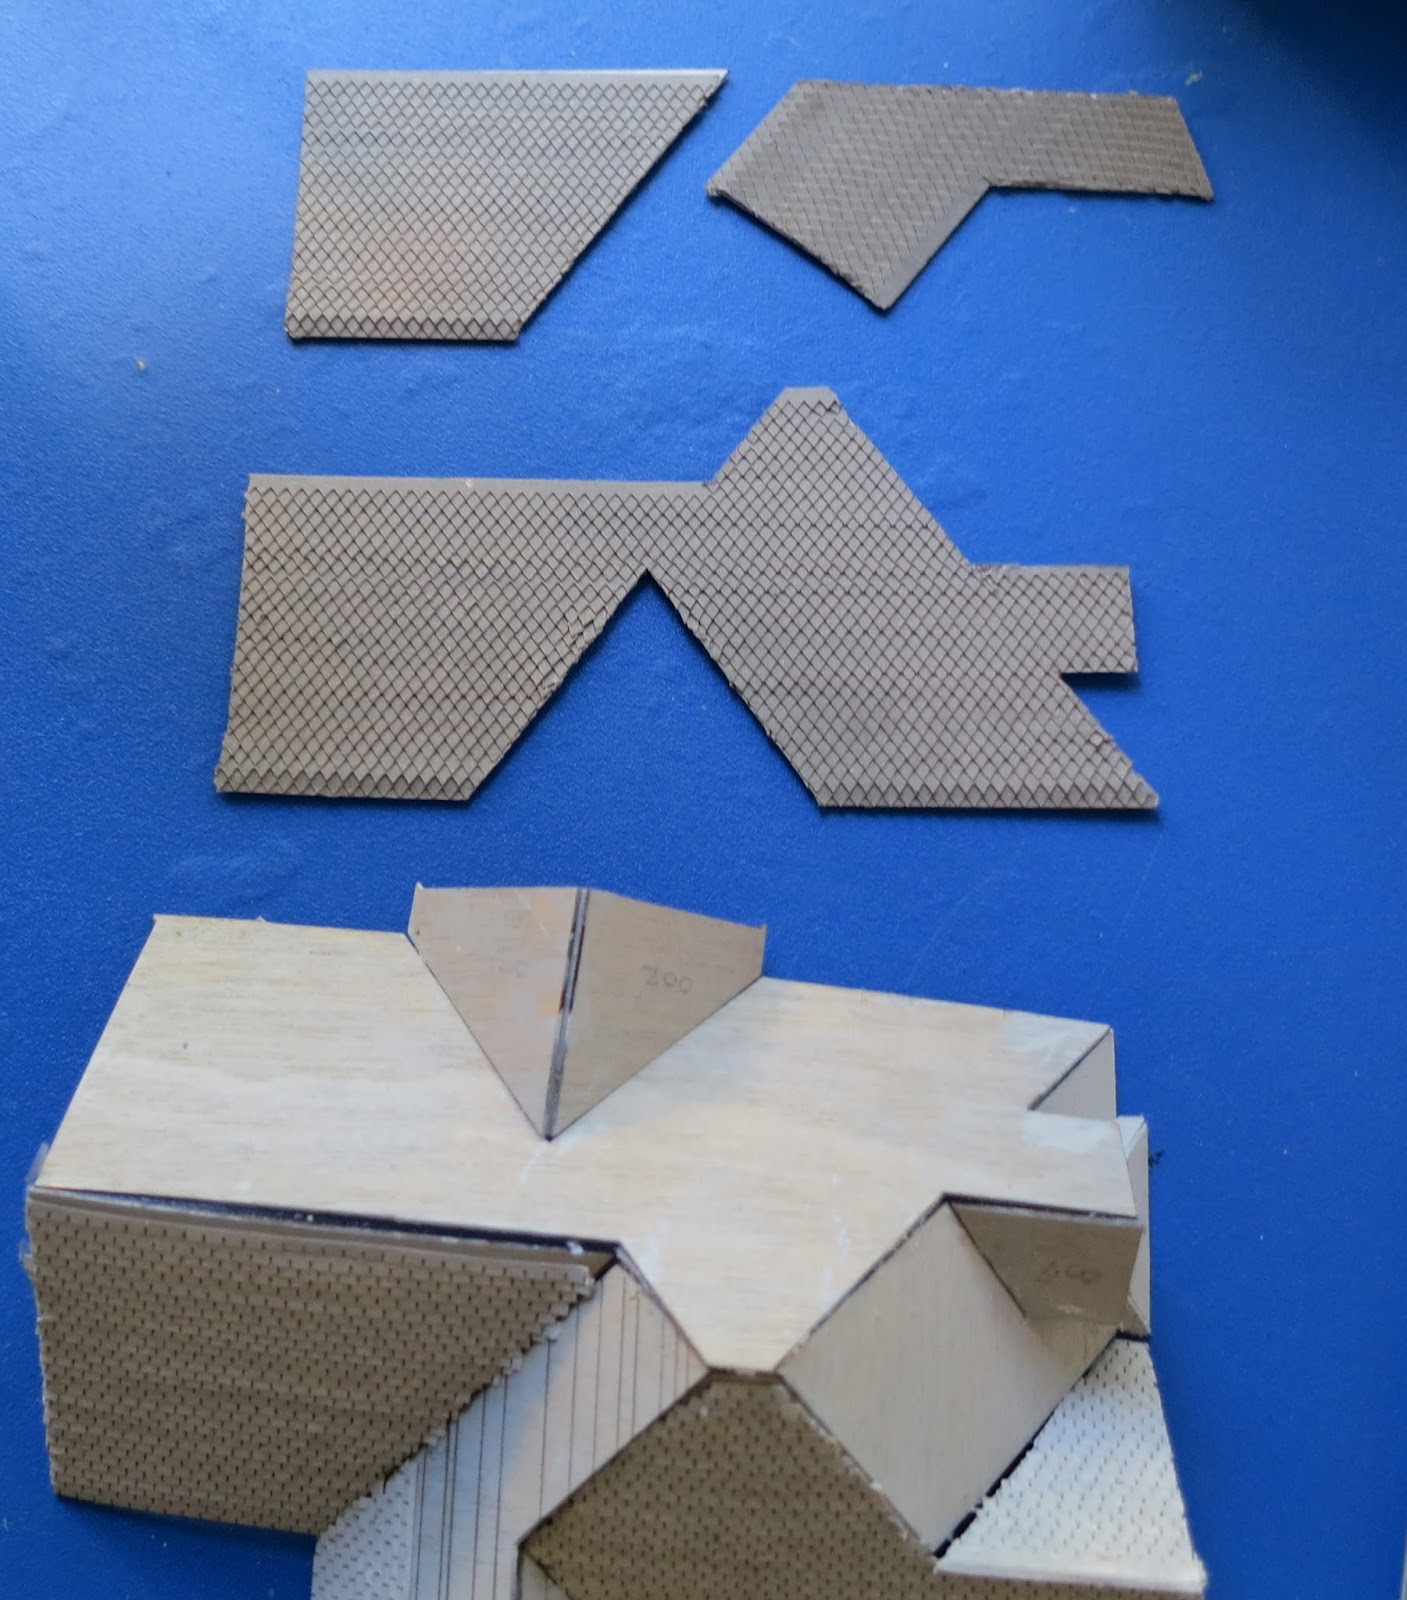
Can you see the problem I discovered when I was done? The big "oops" of the day?


Yup, I shingled the biggest roof plane ON THE WRONG SIDE.

In the picture to the right, you can see the pilot house with the partially-shingled roof (proof of concept) and see what's wrong.


I had checked, dry fit, labeled, and checked again. Then, I got distracted by something else, had to do a bit of work, and put all the roof stuff carefully aside so it wouldn't get mucked up. I must have mixed things up when I unpacked it and restarted the project. Sigh.


The lovely thing about the self-stick shingles is that I could pull them all up (more or less) together. Here's the misfit with the correct side of the roof.


Here's the intact piece (V E R Y carefully pried up) placed on the other side of the roof plane and with the two protrusions cut off and grafted in. Sigh. You can see that, tomorrow or the next time I work on this, I'll need to fill in the gap at the top right and the lower left. Sigh again. 


 Meanwhile, here's today's progress resting on the pilot house partially-roofed house. There are five small planes left to shingle. (It's not so clear from this photo, but the upper right-most plane is done in the rectangualr shingles. Therere's one complete gable to shingle (on the left), and half of two gables (top of photo and to the right).  I'm going to need at least one more package of shingles per house. I'll finish it rather than estimating this time!

Tomorrow is bound to be better, right? And today wasn't a BAD day, just frustrating in how totally dumbheaded I was. I enjoyed myself, all except for the parts where I was realizing what a dumb stunt I'd pulled off. I'm still looking forward to tomorrow. And I did reasonably well (not perfectly, but reasonably well) managing my shoulders and posture. So that's something, at least. More later.

Saturday, June 22, 2013

More Painting and Shingling


Ok, I gave up on WordPress entirely; I like the template there more, and there's clearly power to be had, but learning to use it (at least for this purpose) is more trouble than it's worth. Plus, the template I liked (free) couldn't be set (by me) to show entire posts; it defaulted to excerpts, which isn't ideal for this purpose. There may be a way to do it in the free version, but what it mostly wanted me to
I’m making steady progress on the foundational stuff: priming, staining, shingling.
IMG_1891IMG_1892
On the pilot house, I used rectangular shingles, but I’ve switched to diamonds for the “real” thing, as that’s what the house actually has. Happily, the diamonds are easier to apply than the rectangles, as the pattern helps with the alignment. Still, as you can see, in the first piece, I still got a little off by the end. I think that will be covered by the flashing (is that the right word?) that goes across the top of the peak. I hope. I should get better at this, because each roof has (give or take) 13 planes to shingle (gulp). I’ll get a lot of practice!
IMG_1888
The system we devised for steps is going to work, I think, though I haven’t succeed in sanding the seam out. Yet. Our steps get into pretty ratty shape after an exposed winter, but they don’t have a seam. So  I need to devise a way to cover up the seam, decide to live with it, or else maybe make the steps look ratty to distract from the seam?  Still mulling… Each house has four sets of steps, three of which will be assembled this way. (I’m forgetting for the moment how the fourth set is constructed. Need to go back and figure that out. Did I overlook them, I wonder?? Hmmm…) Anyway, there’s steady progress, if not speedy.
IMG_1894
I’m going to have to be more careful, as something I did yesterday is causing problems with my troublesome shoulder/neck/arm assembly, so today I’m being extra careful about the way I sit. I have a whole set of rules about the alignment to maintain (and postures to avoid), so will proceed cautiously.
On to more shingling and painting. I may attempt some of the beveling today, too. Getting the bevels right for where the pieces of the bays connect is crucial for the final look of the house, so I’ve been thinking about how to go about improving on what I did in the pilot house. I still have one spare set of bay pieces I can practice on, so that may be as far as I get today with the beveling. We’ll see. More soon.

Friday, June 21, 2013

Priming

As long as I've been obsessed with this project (which is really the only word for my fixation on it), starting the painting was really satisfying.  Not only does everything need to be primed and painted, but the windows and doors must also be stained. Gratitude to whoever invented the stain pen!   With his characteristic family creativity, Michael made me a custom-drying rack. (Sorry it's a little out of focus; it's an upside-down flower pot with some metal rods through it.)

And another for use on site.  


The thin wood warps so easily, at least for the primer coat, we decided to try spray paint for the primer coat. So far, so good, though the pieces are so light that getting a technique to get good coverage without blowing the pieces around took some trial and error.


Everything is primed, finally, and the next stages are to bevel the bays before painting with the finish coat and to start the shingling process. (Oh, rats. Just realized there's one more roof to prime, and the spray paint is gone. Sigh.) The shingles are self-stick, which is an advance over the ones we made out of cardstock for the house replica we built some years ago. Still, applying them row by row on as much roof as three houses have is going to take some time, so I'm thinking I'll intersperse those two tasks. 

I'm also refining the assembly instructions as I go, just in case. The hardest part of this project was the measuring and developing the specs, and now that is done, SDK could cut additional sets without tremendous difficulty, we think. Writing instructions helps me think everything through one last time, which is always a good thing, and should there ever be any interest in making a kit out of this, the information will have been preserved from this pass through. 

Getting Started

It took a long time to get to the point of beginning to assemble the three models. Started many years ago, the project was interrupted in 2008 for a neurosurgery adventure. Before that happened, the main obstacle to progress was figuring out the geometry of the roof. Google's satellite images helped get us back on track, and then Friend J, studying architecture, galloped to the rescue with his expertise.

In the earlier vision, it was all going to be handcut. This fantasy was dashed fairly quickly upon counting the number and range of sizes of the windows. Again, a wonderful resource came to the rescue: custom laser cutting by SDK Miniatures. Working from our drawings and measurements, SDK laser cut the sides, windows, doors and roof planes. By last summer, we had a almost-complete set of pieces, and dry-fit a pilot house.

The pilot house got dressed (well, enough to test techniques and materials) and assembled, and various corrections made, including adding specs for forgotten pieces, like the back porch!.
\
The roof is just resting on this version, and there's no landscaping, because it's all a conceptual sketch, more than an assembled project. Only part of the roof is shingled, as the roof is large (as these things go) and the shingling is particularly tedious--it didn't seem worth wasting the materials after the approach was validated. Plus, thinking ahead to doing three complete roofs later was daunting.

 Devising a way to construct the sunroom was a particular triumph.

SDK then did another complete cut, incorporating all the revisions from the pilot house experience.We checked and double-checked those pieces, now known as the penultimate run. With one or two final-final adjustments, SDK cut three full sets of custom components. I packed those up, with tools and materials, and have the project along on our summer odyssey. Now to begin!