Trost House

Trost House

Monday, December 30, 2013

Catching Up; House 1 (Virtually) Done; The Wonders of Hairspray


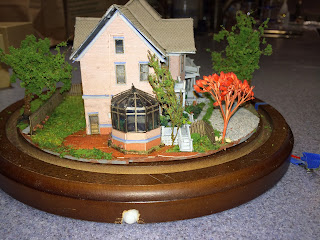
The end of year slowdown has been wonderful for making progress on the houses. House 1 is all but done-- It's mounted on its base, the electricity is hooked up, the dome has been cleaned and polished and it's all landscaped. It feels great and it looks pretty good, too.

There are only a few minor touch-ups and tidying remain to declare victory on the first house, and the others are getting close. House 1 needs one more sidewalk piece, some paint touchups here and there, and valiant eldest daughter is making hostas that will be added as they are completed, along the fence and along the side porch.
We're really fortunate here--not only is she creative and great with the really small stuff, she's making the hostas for all three houses so they will all have a touch of each of us. She's doing the hostas and younger daughter has done a variety of things as the houses have been in progress, in addition to the contribution of her wonderful architect friend, who made the roof possible.  Both girls have done a few things on her own house and contributed something to all three as well. It's truly been a family project.


Along the way, after watching a series of videos (thank you, model railroaders!), I started on making trees. Hairspray is a wonderful invention!!! My hair doesn't need it much, so I'd never understood some of its fantastic properties, especially its stickiness. The first tree was a marvel of discovery all along. This one was made from the inner wires of an old lamp cord that was put aside in the basement, so what you see here is the wire stripped out of the cord, with a bit remaining inside it to form a handle while it was under construction. The pushpin is just to hold it up for the photo and for considering placement in the final project. The big trees will probably be offset a bit from where they are in actual life, as to put them in the totally accurate locations would obscure house details we decided we'd like to be able to see more easily. 

The porches on both houses 2 and 3 needed to be adjusted once I got to attaching them, but that's now done and both houses have both front and back porches fully attached. Adjustments included straightening columns a bit, restoring railing that had gotten jostled out of place in handling, and some fit adjustments so they would sit tightly against the body of the houses. Some of that was fiddly work, and I think it's all done now. It's quite satisfying, especially when you stand back and look at the whole effect instead of focusing on specific defects and problems. (Isn't that always the case??)


Now, it's on to finishing other aspects of Houses 2 and 3. Both now have their upstairs lighting hooked up ,and landscaping is under way. House 2 has sidewalks and a driveway, both houses have fences, and to different degrees, each have some yard. 


The end is truly in sight for this project of many years now!!


Monday, December 9, 2013

Thanksgiving Weekend Progress--and the Next Weekend, Too

Finally! Thanksgiving weekend brought time and energy to resume work, which was a wonderful and rejuvenating time. The girls were here and each contributed to the forward progress; one worked on fittings for her kitchen (what happened that those weren't there already??!?), and the other pitched in with a whole range of helpful things, including brainstorming on how to address the problem with the back wall and roof attachment. That cleared a major logjam and permitted real progress. Now, all I have to do is see if I can execute the new plan and make it work. Stay tuned on that front.

All three houses are recognizable now and it was even time to make the final list of what remains to be done: and it all fits on one page!! Once the work got restarted and the work area uncovered from things that had piled up on it, it gained a momentum of its own. The next weekend saw progress, as well. The photos of some of the work seem to have gone AWOL, so some intermediate steps are missing here and this shows the combined progress.

Either I don't understand Blogger's editor at all--entirely possible--or it's really strange. There's something about photo placement and captions that I cannot seem to manage and haven't found the slightest clue in any documentation. It's maddening. I've done the best I can in the time available and called it good enough. It's not really, and at the same time, it's better than nothing, so here it is. Whew. 

House 1 landscaping in progress (sidewalks not attached)
House 1 landscaping in progress and preparing base for lighting
House 1 is close to complete: Tech Support helped with notching the bases for the lighting and battery, and came up with a plan and then executed it for all three houses (pictures at next opportunity).
House 1 side view: landscaping in progress

House 1 side landscaping in progress
House 1 driveway and landscaping in progress; no back fence yet
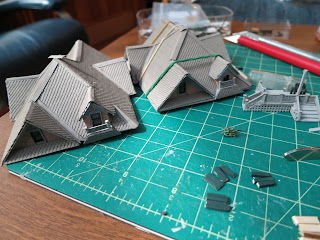
House 2 acquiring its roof and back porch
House 2 is coming right along: it's time to start its landscaping (almost). 
House 2 back porch gluing on (roof straightened after picture taken)
House 3 porch renovations: straightening crooked railings and columns


A review of the houses showed that House 3's front porch had major issues, so parts of it got taken apart and reassembled, trying to correct them. Progress there, too! The last side porch column still needs a cap, and as the column appears to be a bit shorter than others, a solution is still brewing for that one. 

Sunday, September 15, 2013

Incremental Progress

There's no good reason for this, except I love this new shower curtain. The colors and pattern really make me happy. 

 
Plan A isn't going to work for making the roof detachable with magnets, not because the magnets won't work, but because the roof won't be able to go on and off with the back glued in place. Back to the drawing board on that aspect. 


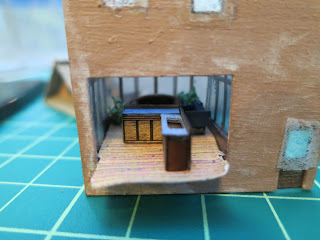
 Meanwhile, furnishing the parts of the kitchen that will show on House 1 moved forward, including the counters and some greenery inside the sunroom.

More to come later, as soon as some of the kinks in Plan B for the roof/back of house get worked out.

Saturday, September 14, 2013

Finally Back At Work: Making Adjustments and Re-Planning

Since we've been home, there hasn't been much progress on the houses because there hasn't been a place that where it could all be left set up--every single time, all the houses had to come out, the tools retrieved, the parts, etc. It took so much time to get things out and then clean up afterwards, it was a real deterrent. So, today, we set up an area where I could leave everything out all the time. Once we got it set up, it was back to figuring out how to solve the problems that remain: the bad fit where the back of the house attaches (width/depth of materials miscalculations, we think), what to do about fixing the lighting and being able to take the roof off, how to set up the driveway, etc. 


 The last time any work moved forward (more than a week ago now!!), all three of the back porches finally got completely dressed: plants, plant/window boxes, etc. They look great, if I do say so myself. This picture doesn't fully show it off well because of the splotches on the ground underneath. They do look nice, though.
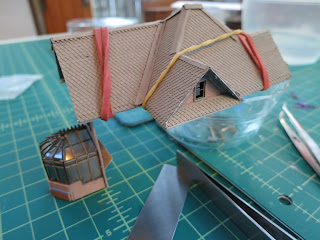
Today was all about figuring out what to do about attaching the roofs to the attic plane and how to attach the lighting and let the roof be removable so the furnishings/inside could be seen. The first plan of attack involved gluing some magnetic strips in place. In hopes that will work, I  glued the roof to the attic plane for House 1 after altering the way the back wall will attach to the roof. None of the pictures turned out to illustrate the problem and first proposed solution, so I'll try taking pictures again later. In brief, the problem is that the original design envisioned sliding the back wall down through notches in the attic plane, but it doesn't fit once the sunrooms are on, and the sunrooms really have to go on before the back wall is affixed to the houses. Plan A for this problem involves cutting off one of the notches and planning to re-glue it in a later step, after the back wall and roof are on. The back porch roof on House 1 also got applied today, but that picture didn't turn out, either. Sigh. Will try again next time.

This picture (tries) to show the magnetic strips, Plan A for a totally different issue--trying to make the roofs detachable. By paring down the height of two of the walls that shouldn't show much, and gluing the bottom magnetic strip in place, I'm hoping that aligning and gluing the strip to the roof plane will help with letting the roof be lifted on and off. If the lights are glued to the tops of the walls instead of the ceiling of the second floor/attic roof plane, I'm hoping this approach will work. This pilot effort is on House 1, so it will be adapted as things move forward on the other two houses. With any luck, by the end, there will be a system that really works!

Monday, September 2, 2013

Picking Up Again... Home Stretch


So here's where we left off, with the three new houses, plus the original pilot house (incomplete, as it was a conceptual sketch only) packed for travel. They traveled quite safely, nestled in their compartments, with a snugly-fitting lid and just a little packing to keep them from sloshing about side to side. No damage at all in the travel, though I carried the box rather than trusting it to the luggage. Good thing I did, since the luggage didn't show up for three days and I would have been a nervous wreck. The one piece that didn't get here on time is the one in which I would have packed the box of houses, so for once, Murphy and his vexing law were defeated. 

Carrying the box in a handled bag wasn't a problem at all--it was light and not at all unwieldy. There was no problem with it getting bashed around in overhead bins, so that all worked out nicely.


When I picked up again, the first thing was setting up a workspace, which should have been an easier thing to do since we have so much more space here, but somehow was much harder to figure out. Here's my new rolling workspace so I can follow the light and be around other people in a sociable way without being completely underfoot. I'm really happy with it and how it's working out. And organizing it was most satisfying.


Assessments in process. Checklists being developed.

The next step was assessing what's left to be done other than the landscaping, which is the major task not even started yet. Sadly, the assessment revealed a number of little things in uneven states of completion: the small gable had railings on one and not other the other two houses, and some of the interior walls that weren't glued in yet went walkabout on the journey. They haven't reappeared yet, though I expect that will happen soon, since I measured, cut and painted replacements yesterday for installation today. 

Railings completed on small gables.
Trash cans (in foreground) under construction.


Some of that was easily fixed; the small gable dressing has been completed, a few pieces that were complete but not installed taken care of, etc. 

For example, all the rocking chairs were placed on the front porches, as it seemed wise to get this done before they got damaged, as they're quite fragile.  They were home before us, awaiting our arrival.  


Sadly, the assessment revealed that there's a construction/design flaw in the roof/back of house that will need to be addressed, as in the process of assessing the roofs, it became clear that my plan for attaching the back of the houses isn't going to work now that the sunrooms are all constructed and attached: the sunrooms are close enough to the edge of the wall that the back wall will not slide through the notches provided. (Pictures tomorrow.) It's looking like the wonderful notches that seemed like such a clever solution will have to be retrofitted, probably with a knife and then glue to reattach after the back of the house is on. Since there's been some talk of not gluing on the roof plane, but using some other way to attach it, given the mushroom factor that caused the second floor to end up so much more furnished than originally expected, this may turn out to be a blessing in disguise. Still, in the moment, what it most felt like was a total failure of anticipation and planning. Sigh. 

The progress of the back porches, though, has been totally satisfying, with plants, trash cans, etc. The conceptual plan is complete and tested out on House 1. There's one small fit problem with how the back porch connects to the sunroom to be puzzled out for two of the houses, but not the other. Not sure why that would be, so must measure and mull a bit more on that one. Still, there's visible progress and the back porches for the other houses can be dressed next,. 

There are still sidewalks and  fencing to design and the landscaping to be placed, once the houses are secured, the lighting attached and the final plan formulated and executed. for how the roof and back of the house will be attached. 


And thus endeth the first weekend at home. 

Saturday, August 17, 2013

Nearing the Stopping Point for Now

House 3 upstairs furniture
pilot house, House 1 and House 2 waiting for House 3
All three houses have their components constructed. They're not fully assembled because I don't have the kitchen furniture (counters) yet, and they won't transport well with the porches or roofs on.


There are some more details to add, including in the second floor and kitchen furniture. The final assembly and landscaping will take a bit of time as well; that requires the bases and domes and no more major transportation of multiple houses at a time. It's a big, big milestone.


Of course, I discovered late in the day that the small gable isn't on House 3's roof yet (no clue why or how that escaped notice) and I'm sure that, along the way, other details that have been skipped or overlooked will emerge--or inspirations about ways to improve/embellish what's already here. For example, it occurs to me as I write this that the front doors don't all have doorknobs, though they do all have mailboxes!

Friday, August 16, 2013

House 3 has Walls! Transport Plans

House 3 has all its walls in place! To go yet: second floor furniture, attaching porches and sunroom, landscaping. House 2 still needs its brick applied; I was going to do it today and just couldn't quite bring myself to that job. Still, it's been a good day.


Michael worked a bit on how we're going to transport all four houses (pilot house, three finished houses) and came up with a pretty elegant solution. We'll put some packing peanuts in to cushion things a bit, but the fit is so good, not many will be required.